Sécuriser Web API .Net Core avec une clé Api (Api Key)

Introduction
Avec le nombre des APIs qui augmente aujourd’hui y a de plus en plus de hackers qui dirigent leur attaque sur des APIs. Alors leur sécurité devient indispensable.
Dans cet article on va voir comment sécuriser une Web API .Net Core avec une Clé d’API (API Key).
Démo vidéo
Cette vidéo montre étape par étape comment sécuriser web api .NET Core avec une clé api.
Etape 1 : Paramétrage
Premièrement ajouter une clé dans votre fichier de config « appsettings.json », ça sera votre clé d’API, c’est la clé qui doit fournir le client dans l’entête de l’appel HTTP.
"AppSettings": {
    "ApiKey": "12345"
}
Etape 2 : Redéfinir le handler d’authentification
Ensuite créer la class « ApiKeyAuthenticationOptions.cs » qui hérite de « AuthenticationSchemeOptions.cs ».
public class ApiKeyAuthenticationOptions : AuthenticationSchemeOptions
{
    public const string DefaultHeaderName = "X-Api-Key";

    public string HeaderName { get; set; } = DefaultHeaderName;

    public const string DefaultScheme = "API Key";

    public string Scheme => DefaultScheme;

    public string AuthenticationType = DefaultScheme;
}
Par la suite, créer la class « ApiKeyAuthenticationHandler.cs » qui hérite de « AuthenticationHandler ». Ici on doit redéfinir la méthode « HandleAuthenticateAsync() » c’est cette méthode qui va checker la validité de l’Api Key, on récupère notre clé du fichier de configuration (étape 1) et comparer avec la clé fournie par la client appelant dans l’entête de la requête HTTP.
Attention le nom de la clé dans l’entête HTTP doit être le même que celui déclarer dans cette méthode ici c’est : X-Api-Key
public class ApiKeyAuthenticationHandler : AuthenticationHandler<ApiKeyAuthenticationOptions>
{
    private const string ApiKeyHeaderName = "X-Api-Key";

    public ApiKeyAuthenticationHandler(IOptionsMonitor<ApiKeyAuthenticationOptions> options,
                ILoggerFactory logger,
                UrlEncoder encoder,
                ISystemClock clock) : base(options, logger, encoder, clock)
    {

    }


    protected override async Task<AuthenticateResult> HandleAuthenticateAsync()
    {
        var expectedApiKey = Context.RequestServices.GetRequiredService<IOptions<AppSettingsSection>>().Value;

        if (!Request.Headers.TryGetValue(ApiKeyHeaderName, out var apiKeyHeaderValues))
        {
            return AuthenticateResult.NoResult();
        }

        var providedApiKey = apiKeyHeaderValues.FirstOrDefault();

        if (apiKeyHeaderValues.Count == 0 || string.IsNullOrWhiteSpace(providedApiKey))
        {
            return AuthenticateResult.NoResult();
        }

        if (expectedApiKey.ApiKey.Equals(providedApiKey))
        {
            var claims = new List<Claim>
            {
                new Claim("ClaimType", "ClaimValue")
            };
            var identity = new ClaimsIdentity(claims, Options.AuthenticationType);
            var identities = new List<ClaimsIdentity> { identity };
            var principal = new ClaimsPrincipal(identities);
            var ticket = new AuthenticationTicket(principal, Options.Scheme);

            return AuthenticateResult.Success(ticket);
        }

        return AuthenticateResult.Fail("Invalid API Key provided.");
    }
}
Enfin, créer la class statique « AuthenticationBuilderExtensions.cs »
public static class AuthenticationBuilderExtensions
{
    public static AuthenticationBuilder AddApiKeySupport(this AuthenticationBuilder authenticationBuilder, Action<ApiKeyAuthenticationOptions> options)
    {
        return authenticationBuilder.AddScheme<ApiKeyAuthenticationOptions, ApiKeyAuthenticationHandler>(ApiKeyAuthenticationOptions.DefaultScheme, options);
    }
}
Etape 3 : Intégration à Swagger
Si votre API intègre Swagger vous devez configurer ce dernier pour la prise en compte de votre Api Key lors des appels depuis son interface
Ajouter le code suivant en suite à votre configuration Swagger.
services.AddSwaggerGen(c =>
{
 //...
  var security = new Dictionary<string, IEnumerable<string>>
    {
        {"ApiKeyAuth", new string[] { }},
    };

    c.AddSecurityDefinition("ApiKeyAuth", new OpenApiSecurityScheme
    {
        In = ParameterLocation.Header,
        Type = SecuritySchemeType.ApiKey,
        Name = "X-Api-Key",
        Description = $"Standard Api Key header authentication."
    });

    c.AddSecurityRequirement(new OpenApiSecurityRequirement()
    {
        {
            new OpenApiSecurityScheme
            {
                Reference = new OpenApiReference
                {
                    Type = ReferenceType.SecurityScheme,
                    Id = "ApiKeyAuth"
                },
                Scheme = "API Key",
                Name = "X-Api-Key",
                In = ParameterLocation.Header,
            },
            new List<string>()
        }
    });
});
Etape 4 : le startup
Déclarer l’authentification dans le startup.cs dans la méthode ConfigureServices().
public void ConfigureServices(IServiceCollection services)
{
    //...
    services.AddAuthentication(options =>
    {
        options.DefaultAuthenticateScheme = ApiKeyAuthenticationOptions.DefaultScheme;
        options.DefaultChallengeScheme = ApiKeyAuthenticationOptions.DefaultScheme;

    }).AddApiKeySupport(options => { });

    services.AddControllers();
}
Puis ajouter les instructions suivantes dans la méthode Configure().
public void Configure(IApplicationBuilder app, IWebHostEnvironment env)
{
    //...

    app.UseAuthentication();
    app.UseAuthorization();

    //...
}
Etape 5 : la touche finale
Ajouter l’attribut [Authorize] sur les actions de vos contrôleur que vous voulez sécuriser par la clé Api.
[Authorize]
[HttpGet]
[Route("ping")]
public IActionResult Ping(string mode)
{
if (mode == "ok")
{
return Ok();
}
else
{
return StatusCode(StatusCodes.Status500InternalServerError);
}
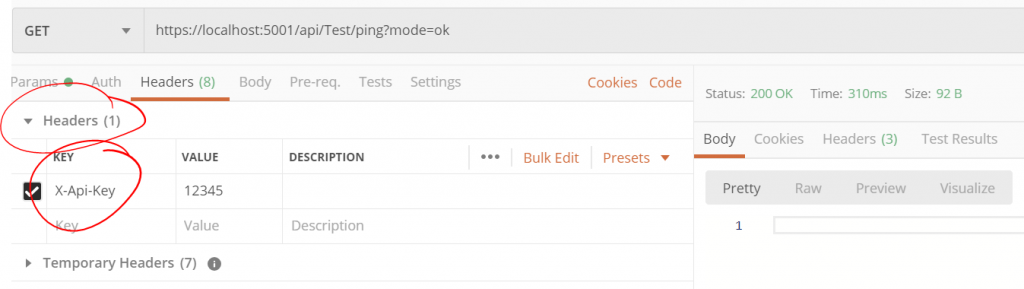
}Etape 6 : Test
Vous pouvez utiliser Postman ou tout autre client pour tester votre Api sécurisée, afin de le faire ajouter une clé dans l’entête de votre requête avec le même nom que vous avez spécifié à l’étape 2.
Hi there very nice website!! Man .. Excellent ..
Superb .. I’ll bookmark your web site and take the feeds additionally?
I am happy to find a lot of helpful info here within the publish,
we want develop more strategies on this regard, thanks
for sharing. . . . . .
My blog – best CBD oil for anxiety
Hi,
Thank you man. The feed : https://logicmind.fr/feed/
For document sharing use : https://sharit.eu
Hello, always i used to check web site posts here in the early
hours in the morning, as i like to learn more and
more.
My partner and I absolutely love your blog and find
nearly all of your post’s to be what precisely I’m looking for.
Does one offer guest writers to write content for you?
I wouldn’t mind creating a post or elaborating on some of the subjects you write related to here.
Again, awesome weblog!
What’s up mates, how is everything, and what you desire to say about
this article, in my view its really awesome in support of me.
Hello! Would you mind if I share your blog with my facebook group?
There’s a lot of people that I think would really appreciate your content.
Please let me know. Cheers
Hello, Yes, you can share it no problem.
Best regards.
With havin so much content and articles do you ever run into any
issues of plagorism or copyright infringement?
My website has a lot of exclusive content I’ve either authored myself or outsourced but it seems a lot of it is
popping it up all over the web without my agreement. Do you know any solutions
to help stop content from being ripped off? I’d truly appreciate it.
We stumbled over here by a different website and thought I should check
things out. I like what I see so now i’m following you. Look forward to finding out about your web page
again.
Hello there! I could have sworn I’ve been to this website before
but after checking through some of the post I realized it’s new to me.
Nonetheless, I’m definitely happy I found
it and I’ll be book-marking and checking back frequently!
Feel free to visit my blog post: download mega88
Wonderful post.Ne’er knew this, appreciate it
for letting me know.
It’s an amazing article in support of all the online users;
they will obtain benefit from it I am sure.
Very nice post. I just stumbled upon your blog and wished to
say that I’ve really enjoyed surfing around your blog posts.
In any case I’ll be subscribing to your feed and I hope you
write again very soon!
Nice answer back in return of this issue with solid arguments and describing
all concerning that.
Because the admin of this website is working, no hesitation very shortly it
will be renowned, due to its feature contents.
This website was… how do I say it? Relevant!! Finally I have
found something that helped me. Many thanks!
I couldn’t resist commenting. Very well written!